I haven't tried these garnishing techniques yet, but they sure do look fun and easy. I plan on using the carrot techniques particularly. I with that my daughter liked cucumbers and bell peppers. Check out the chicken made from an egg. Way too adorable.
I don't go over the top with the cute stuff, but shaped carrots? Easy and fun.
On another site that I found, there are even more ideas. (The setup of that site is not as nice as the other, though). I wonder if I could get my daughter to eat beets if they looked like a rose? Another carrot idea is to use them as kind of a napkin ring. Very cute. My daughter appreciates steamed broccoli in her lunch, but would she eat the tomato cup, too? I've done strawberry flowers before for a party, and they are very pretty and not very hard.
I can't wait to start playing with her food!

Friday, August 28, 2009
Thursday, August 27, 2009
For the boy - lunch 8.27,09
Usually, my mother-in-law watches my kids, and she feeds them lunch. Today, she is taking the girl, but she couldn't take the boy (it's a car seat thing, she has a temporary car, blah blah blah). Long story short, the boy is going to a dear friend's house for the day, and I packed him a lunch.
 He's got a peanut butter and jelly sandwich on whole wheat bread, apple juice, peaches, a couple mini pumpkin zucchini muffins, Welch's yogurt covered blueberries, Bug shaped Graham crackers, a babybell cheese (with a P cut out on the wax for his name), and some raisins.
He's going to be there all day, so I didn't want him to run out of food.
He's also bringing some cheerios and a yogurt for breakfast. I would have liked more fresh fruit, but this was an unexpected lunch packing, and I was left unprepared. I would have also liked to pack some carrots for a veggie, but again, none in the house. I need to go shopping for produce before school starts next week. He's got zucchini in the muffin - that counts, right?
This took less than 5 minutes to pack. It's all grab and go. It doesn't have to take a lot of time to pack a nice lunch.

Recipe - Healthy Whole Grain Mini Bagels
Here I go again with the mini things. But seriously, they fit better in the lunch box, and they are so cute. Bagels are expensive to buy and relatively easy, though slightly time consuming, to make.
These have a very nutty flavor, and we like them. Some herbs might be nice. This recipe probably made close to 24 mini bagels.

 I formed a few into bagels, but did the majority as bagel sticks (and, yes, I am aware that they look like little sausages). About half the sticks, I rolled in cinnamon sugar before baking. Sticks fit a little better into a lunch box, are a better size for my daughter, and are much quicker to form than regular bagels. I even did a couple as twists, but decided it wasn't worth it for the minimal effect.
The overnight rise in the refrigerator helps to develop flavors. You could skip it and let them rise like a normal bread (30 minutes or so), but I think it's much better with the longer rise.

Don't be intimidated, give them a try!
Healthy Whole Grain Mini Bagels
1 1/2 c. warm water (110-115)
1 1/2 T. honey
1 pkg. yeast
1/2 t. salt
1 1/2 c. whole wheat flour
2 c. bread flour
3 T oat bran
3 T wheat germ
3 T flax seed (ground)
2 T wheat gluten
1/2 c rolled oats
Combine ingredients in bread machine (in the order recommended by the manufacturer), and let it go through dough cycle. Punch down the dough and divide into about 24 equal pieces. Shape each into a ball, flatten and poke a hole into each. (If doing bagel sticks, I like smallish sticks, about 3-4" long, and they made quite a few more sticks than mini-bagels.) Place on baking sheets, cover with saran wrap, and allow to rest and rise in the refrigerator at least overnight. They can stay in the fridge up to two days.
When ready to cook, bring a large pot of water and 2 T. baking soda to a boil. Drop each bagel into the water (don't crowd the pot) and boil for one minute, then flip and boil for another minute on the other side. Place on racks to dry.
 Preheat oven to 500 F. Place on a greased cookie sheet (I used a baking sheet with a silicone baking mat, you can also sprinkle cornmeal on the cookie sheet) and bake for 5 minutes. Rotate baking sheets in the oven 180 degrees, turn temperature down to 450 F, and bake for 5 minutes more, or until golden brown. Let cool on racks before serving. Freeze very well.
Wednesday, August 26, 2009
Recipe: Mini Swedish Bullar (Cinnamon Rolls)
Another mini-baked good, these would make a great little treat in a lunch. I made them in mini-muffin tins, and they would also freeze wonderfully. Bite sized heaven!

Bullar differ from American Cinnamon rolls in a couple of ways. The dough has a little cardamom in it, there is no icing, and they are made in individual muffin wrappers. If you can find Scandinavian Pearl Sugar, that is the ideal topping for them. If you can't find it, you could dip in butter and then a little granulated sugar before serving. Pearl sugar is worth searching for.
Swedish Bullar (Cinnamon Rolls)
Swedish Bullar (Cinnamon Rolls)
Dough:
1 c milk (I used skim)
1/4 c butter
3 c flour (I used 2 c white, 1 c wheat) *more or less depending on consistancy of dough
1/3 c sugar
~1/2-1 tsp ground cardamom
1 Tbsp yeast
Filling:
1/4 c melted butter
1/4 c sugar
1 Tbsp ground cinnamon
1 beaten egg, pearl sugar for garnish
If you have a bread machine, that is ideal for the dough. Put ingredients in the bread machine according to your machine's specifications, and set to dough cycle.
If you do not have a bread machine, melt the butter in a large pan and add the milk. Let mixture reach lukewarm and remove from heat. Stir the yeast into the liquid and make sure it is well blended. Add salt and sugar, and cardamom. Mix in half the flour and stir. Then, add the rest of the flour, stirring until dough is no longer sticky. Knead the dough for a couple minutes, then let it rise for 30-45 minutes.
Make filling - stir sugar into butter, and add cinnamon.
Roll dough out into a large rectangle (I did mini-bullar, so I divided into about 4-5 portions, and rolled into long, skinny rectangles, about 6" wide. For larger bullar, make the rectangle wider.) Roll it to about 1/4" thick or thinner.
Spread filling over rolled out dough, then roll up, and slice every 1 1/2" or so (smaller for mini-bullar). Put each piece, cut side up, into a muffin cup (mini-muffin cups for mini-bullar). Allow to rise under a towel for ~30 minutes.
Preheat oven to 425 F. When the bullar are done rising, brush with egg and sprinkle with pearl sugar, if available. Bake ~5-7 minutes, or until they are golden brown.
Recipe: Pumpkin Zucchini Mini Muffins
Muffins are great in lunches! I make a batch, freeze them, and pull them out in the morning or at night when I pack lunch. By lunchtime, they are thawed and delicious!
Even better than muffins are mini-muffins. Kids love miniature things (I find).
So, you could make these as big muffins and add some baking time, or make your kid happy and make them mini. (And, as a bonus, it uses up some zucchini, if you are looking for recipes accomplish that goal)
Pumpkin Zucchini Mini Muffins
3 eggs, lightly beaten
2 cups sugar
1 cup canned pumpkin
1/2 c butter, melted
1/2 c applesauce
1 tablespoon vanilla extract
1 1/2 cups all-purpose flour
1 1/2 cups whole wheat flour
1 teaspoon baking soda
1/2 teaspoon baking powder
1/2 teaspoon salt
1/2 teaspoon ground cinnamon
1/2 teaspoon ground nutmeg
1/2 teaspoon ground cloves
1/4 teaspoon ground ginger
1 cup shredded zucchini
In a mixing bowl, combine eggs and sugar. Add pumpkin, butter, applesauce and vanilla. Combine dry ingredients; gradually add to pumpkin mixture and mix well. Stir in zucchini. Scoop into mini muffin tins (papered or sprayed). Bake at 350 degrees F for 10-15 minutes or a toothpick comes out clean.
My Gear
(This does not include cooking and baking supplies)
So, admittedly, I am a bit crazy. In my defense, most of these boxes were less than $2 each from Ichibankan before they closed their online store. Now, you could probably find similar ones, at slightly higher prices, by searching for Bento on ebay.
 It started simple. These are Lock n' Lock that you can find at Walmart, and the larger ones are called Biokips, and they were carried by a local store for a while. I snagged them, then they disappeared. They are cool, too, because they have dividers in them.
Because isn't that the way it always goes.
So, I began searching for additional containers. That's when the madness set in....

First, I found these at the grocery store. Simple, sweet... but kind of small and boring. And you can't fit two in a standard lunchbox (we have one from Land's End). So, they were great for snacks, but not so great for lunch.
 Off in search again, I discovered the dangerous (and sadly no longer available) website from Ichibankan, akin to a Japanese dollar store that has shops in some places, mainly California. Since I am in Vermont, the brick & mortar shops weren't happening, but the online store was great while it lasted.
I got these square containers (great for snacks! They fit into the top pouch of the lunch box, and since my daughter is young, she gets a morning snack). They are about 4"x4". Perfect.
 And then, there's lunch... here's where the fun begins. Two of these ovals usually make about the right amount of lunch. And they are so cute! I just can't get enough of them! (There is one two-tiered one in there. I'm not a huge fan on that one. It doesn't fit as well in the lunch box).
I am so in love with this size that I am always on the lookout for more, even though I obviously don't need more. I mean, I have one kid in school. My other kid is 3, and he doesn't go to pre-school. (By the way, it's REALLY hard to find non-Pokemon etc boyish boxes... always on the lookout for those, for when he goes to school... but I digress).
 And to go along with these beauties? Dividers. Silicone muffin cups work really well (and you can get them in sweet shapes, too. I don't have shaped ones. Yet. Some of the boxes also came with these pink dividers. They work great. They don't fit in all of the boxes, though, and that's a bummer.
 Another thing that's really handy are little tiny sauce containers. They are perfect for ranch dressing or ketchup or nutella or hummus or all sorts of little dips. I found these at Ichibankan, but I've seen them on ebay. I love them, and I really think they are necessary. Maybe not as many as I have, but a couple at least... They are really small, about an inch and a half across at the most. And yes, there is a little penguin in back there. Don't buy it. It's cute, but the latch broke after the first use and I can only use in for very secure things now. I would toss it, but I'm afraid my daughter would stage a revolt.
 These little covered containers are also super handy. I use them for things like mandarin oranges or applesauce or yogurt or other slightly wet fruit. The little ovals are about 1 1/2"x3" and fit readily inside the larger oval boxes. The squares (at least the larger one) don't fit as well into the larger boxes, but I just couldn't resist them. I mean, that squirrel is about the cutest thing ever. I had to get it.
 Skewers and food picks are a really fun way of adding some zest to your kid's lunch. Kids seem to just love things served on sticks! I have a little container full of them and my daughter loves them. I make mini sausage and cheese kabobs for her and she really likes those. Skewering fruit instantly makes it more fun. Trust me. These range from really tiny (less than 1/2" pick length) to about 3" long. Sometimes, it's just fun to stick one in the top of something which is otherwise mundane.
 I have an unabashed love affair with cookie cutters of all sizes, and these little mini sets are just lovely. I can use them to make shapes in the wax around a Babybell cheese, or to cut out pieces of ham or thinly sliced carrot. The possibilities are endless. (And I have a whole lot more where these came from). Those little mini cookie cutters you see at the store might not be great for making actual cookies, but for decoration, they are fantastic.
 Now, here's where I get a little fancy (and even more crazy). Hard boiled egg molds. So super cute. My daughter loves hard boiled eggs. With these little babies, you hard boil an egg, peel it while still hot, slap it into the mold, close it, and put it in the fridge or in ice water. I put them in the fridge overnight. Before you put them in the lunch, just pop them out and voila - shaped egg. They really work. I was skeptical at first. I usually use an egg slicer to cut them in slices, but not always. The heart and star don't work as well as the others. I think you need a bigger egg. They're a different brand or something. You could go super crazy and color the eggs with food coloring or even draw on them with those food markers. I don't usually go that far. I have my limits.
And how do I store it all? Tetris-like in a big giant bin. I can't get any more, you see. Nothing else would fit.
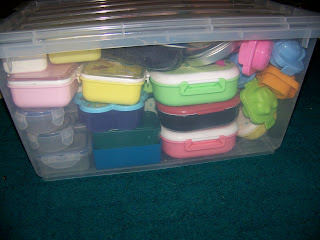
So, admittedly, I am a bit crazy. In my defense, most of these boxes were less than $2 each from Ichibankan before they closed their online store. Now, you could probably find similar ones, at slightly higher prices, by searching for Bento on ebay.

Because isn't that the way it always goes.
So, I began searching for additional containers. That's when the madness set in....

First, I found these at the grocery store. Simple, sweet... but kind of small and boring. And you can't fit two in a standard lunchbox (we have one from Land's End). So, they were great for snacks, but not so great for lunch.

I got these square containers (great for snacks! They fit into the top pouch of the lunch box, and since my daughter is young, she gets a morning snack). They are about 4"x4". Perfect.

I am so in love with this size that I am always on the lookout for more, even though I obviously don't need more. I mean, I have one kid in school. My other kid is 3, and he doesn't go to pre-school. (By the way, it's REALLY hard to find non-Pokemon etc boyish boxes... always on the lookout for those, for when he goes to school... but I digress).

 Another thing that's really handy are little tiny sauce containers. They are perfect for ranch dressing or ketchup or nutella or hummus or all sorts of little dips. I found these at Ichibankan, but I've seen them on ebay. I love them, and I really think they are necessary. Maybe not as many as I have, but a couple at least... They are really small, about an inch and a half across at the most. And yes, there is a little penguin in back there. Don't buy it. It's cute, but the latch broke after the first use and I can only use in for very secure things now. I would toss it, but I'm afraid my daughter would stage a revolt.

 I have an unabashed love affair with cookie cutters of all sizes, and these little mini sets are just lovely. I can use them to make shapes in the wax around a Babybell cheese, or to cut out pieces of ham or thinly sliced carrot. The possibilities are endless. (And I have a whole lot more where these came from). Those little mini cookie cutters you see at the store might not be great for making actual cookies, but for decoration, they are fantastic.
 Now, here's where I get a little fancy (and even more crazy). Hard boiled egg molds. So super cute. My daughter loves hard boiled eggs. With these little babies, you hard boil an egg, peel it while still hot, slap it into the mold, close it, and put it in the fridge or in ice water. I put them in the fridge overnight. Before you put them in the lunch, just pop them out and voila - shaped egg. They really work. I was skeptical at first. I usually use an egg slicer to cut them in slices, but not always. The heart and star don't work as well as the others. I think you need a bigger egg. They're a different brand or something. You could go super crazy and color the eggs with food coloring or even draw on them with those food markers. I don't usually go that far. I have my limits.
And how do I store it all? Tetris-like in a big giant bin. I can't get any more, you see. Nothing else would fit.

What's It All About?
My daughter started kindergarten last year, and I packed her lunch every day. I pack an Americanized bento-style lunch, with ham and cheese in fun shapes instead of onigiri. I love cute containers (and I am so sad that the Ichibankan online store went out of business), but I am not obsessed with the art of the kawaii.
My goal is to pack healthy lunches that are fun for her to eat, and fun for me to pack.
Now that she is starting 1st grade, I thought it would be fun to blog about my lunch packing adventures. If I am packing the same thing over and over again, I won't post the lunch, but I will do my best to keep up with the variety, both for her, and for readers.
School starts in a week, so I have some time to do some informational posts. I'll show you what kind of supplies I have, and I'll post some favorite recipes here and there.
I hope that this will be as fun for you as it is for me!
Subscribe to:
Posts (Atom)