My friend Lisa (from
Explayration)
wanted to make candy canes with her high school chemistry class, and
before she went through the process with a bunch of kids, we thought
we'd try it at home. So, we rolled up our sleeves and faced our fears of
making candy head-on.
We survived to tell the tale, so here it is!
(Visit
Explayration for fun inspiration on teaching about nature and science to kids, and for other awesome stuff Lisa is up to!)
**************************
 |
| A very curly candy cane |
We based our project on
a recipe from About.com.
The recipe calls for:
3 cups of sugar
1 cup of corn syrup
¼ cup water
½ teaspoon of the flavoring of your choice
Food coloring
You will also need:
A candy thermometer
A heat-proof surface like marble or silicone
A heat-proof spatula or board scraper
Kitchen shears
Food-safe gloves
Two baking sheets with sides
Non-stick spray
Bring the sugar, corn syrup, and water to a boil over medium heat, stirring constantly. Once it starts to boil, start using the candy thermometer to monitor the temperature.
 |
This is when the sugar mixture just barely started to boil.
Or, as I said aloud “when things get fun!” |
Keep stirring and boiling until it reaches the “soft crack” stage (around 285 degrees F). This took our batch about an hour. Remove from heat and add your flavoring. We used strawberry.
 |
| Constant stirring is important |
At this point you separate the mixture into halves, one to become white and one to become the colored stripes. Add a few drops of food coloring to the half you want dyed. Leave the white alone, it will become white once you pull it.
The recipe called for half to be kept warm in the oven (about 200 degrees F) while the other half is pulled. This is where your cookie sheets come into play. HOWEVER, if you have two people on the project (which I would highly recommend) I think it would be better to pull both halves at once. Our white half (the one kept warm in the oven) turned into a brick when we tried to pull it. This might have come from a variety of factors, but the oven is my best guess.
And here’s the fun part: how to pull the sugar!
One quick note: make sure to spray everything the candy is going to touch with some non-stick spray. Including your gloves!
 |
| Pretty shiny sugar on a silicone baking mat |
First, pour the sugar mixture onto your greased heat-proof surface.
 |
| See it start to get pearly? |
Let it cool just enough to get a skin, then start folding it with the spatula.
 |
| Pull the sugar to form a long strand and loop the ends together. Then twist it and pull again. |
 |
| The perfect twist |
When it becomes cool enough to handle, don your gloves, spray them, and start using your hands.
Cool, but still pliable!
Repeat the whole process until the sugar is opaque and cool but still pliable.
If at any point you feel it is getting too cool to work with, warm it up slightly in the oven. Be careful that you don’t let it melt though!
 |
| White stripe fail |
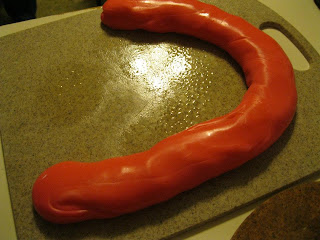
This is NOT what it’s supposed to look like. We couldn’t save this half of the batch, so we decided to dye half of our pink batch red to make stripes. These colors work better for strawberry candy canes anyway.
 |
| Applying aloe to a burn |
Take care, while your gloves will take off some of the heat, you can still be burned. It’s ok to take quick breaks while pulling to give your hands some relief. Or you can trade off with someone else.
Now that you have your two colors, take a small piece of each, in equal sizes, and pull them together while twisting.
When you get the desired width of candy, cut segments of your desired length and bend the top of each into a hook.
Leave your canes out to set. Once they are done be sure to wrap in cellophane to prevent them from getting sticky. We got 67 mini-canes from our half batch, and a great sense of accomplishment.
 |
| Job well done! |
Overall, it was a fun experiment, and one we'd try again.


