I'm so happy to have been invited to
King Arthur Flour's Blog & Bake 2012 - Check out
my post on the first day here.
Day 2 started with a lovely breakfast at
King Arthur Flour. I had some fresh fruit,
Cabot Greek yogurt with vanilla bean, King Arthur flour dried fruit mix, along with a ham & cheese croissant, and a piece of veggie quiche, made in the King Arthur Flour bakery. It was all so delicious... and I didn't even get to the porridge!
Directly after breakfast, we headed down to their newly revamped
Baking Education Center. Our first class of the day was called Knead to Know: Basic Bread Baking. Now, I've done a lot of bread baking in my life, but it is rare that I have ever made bread by hand, without the aid of a stand mixer or my beloved bread machine... so this class was fantastic.
Taught by
Irene Shrover, we were told that all employees of King Arthur must complete at least this course upon hiring. We learned the basics on how to put together a plain loaf of white bread, and also how to make a chemically leavened dough, for scones in our case.
 |
| 1 c of flour does not always equal 1 c of flour... lesson learned! |
Because I have almost exclusively made my bread dough in my bread machine, this was a really great primer for me. I very often use a kitchen scale to measure my ingredients, and Irene demonstrated why this is a good idea. She had us all measure out 1 c flour as we normally would. Mine was 5 oz. The range around the room was 4 oz-5 oz... and Irene told us that KAF recipes use 4.25 oz as a gold standard for 1 c all-purpose flour. So, if you are off my 0.5 oz for each cup, this can really add up in a recipe!!
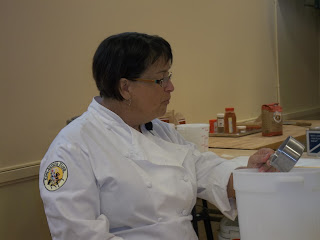 |
| Irene moves really quickly... it was hard to get a decent picture of her! |
Irene taught us that the most accurate way to measure out flour is the sprinkle & sweep method... first, you stir up your container of flour (because it settles), then sprinkle it into your measuring cup using a scoop or other utensil, and then sweep the measuring cup level with a bench knife or a bowl scraper (or some other flat implement...)
We also discussed the difference in yeasts. The most standard yeast today is instant yeast, or active dry yeast. Bread machine yeast is also widely available. Though all of these are somewhat different, Irene told us that you can generally add them directly to your dry ingredients and they work perfectly. Yeast has changed a lot through the years - more accurately, yeast production. I doubt that yeast evolution has made leaps and bounds...
Irene also urged us to stay away from the "dark side" of rapid rise yeast. It only has enough life in it to rise once, and therefore is a poor choice for bread. Again, lesson learned!
Now that we had learned how to properly measure our ingredients, it was time to make some bread! Irene did a demo first, and then we tried our own hands at it. We made some
basic white bread The first thing to do was to measure out dry ingredients. To the dry ingredients, luke warm water was added.
It was then incorporated using a bowl scraper, adding more flour as necessary. It was a rainy nasty day out, so we needed to add a little more flour than if it had been an arid day.
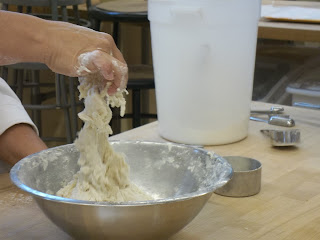 |
| "Shaggy mass" |
Once the dough reached the "shaggy mass" stage (see the picture, this is not easy to explain in words...), we turned it out onto a lightly floured counter and continued to knead, incorporating more flour as necessary.
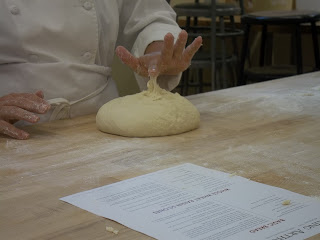
Irene emphasized that having a soft touch with your dough is essential. You don't want to pound it, just to let it know you care about it. The bread was kneaded (adding more flour as necessary) until it felt "tacky like tape, not sticky like glue."
 |
| Kneading |
 |
| More kneading... |
 |
| a little sticky, add a little flour.. |
 |
| DON'T do this to check for kneading completion! |
 |
| "Doorbell test." |
We learned that the best way to check of your dough has had enough kneading is by performing the "doorbell test" - your dough should spring back (like a doorbell that had been pushed, without the jingly music...) when pressed gently with a floured finger.
Then, it's time to transfer the dough to a lightly greased bowl and cover with plastic wrap to rise and rest.
 |
| Hey... guess what I forgot in my first loaf? |
 |
| Not the water... but the *yeast* - which is kind of essential for a yeast bread... so I made two batches of dough, and it was super easy even twice around! |
So, after Irene gave us the basics, we got to try our own hands... we'd come back to shape them after learning about scones. Let me finish the shaping of them here, just so you can see what we did.
First, we let them proof for 45 minutes or so. Then, we "degased" it, which was not as violent as punching it down, but instead, simply kneading out the air gently. Then we separated our dough into two sections.
One section, we simply formed into a loaf, using a technique that Irene called "head and shoulders" - it's a little hard to explain, but basically,, you roll the dough out into a rectangle the length of the pan and three times as wide as the pan. From there, you fold in small "shoulders" and the "head," until you have a nicely formed loaf to transfer to your baking pan.
The other half, we learned to braid.
 |
| Make three ropes of even length. Don't they look kind of like a butterfly? |
 |
| Start in the middle and braid one end |
 |
| FLIP the braid - Irene said the not think about it too much, or you'll mess it up. My first flip was a disaster. |
 |
| Finish braiding the other half after flipping |
 |
| Irene's beautiful braid, as seen on the screen |
 |
| My kind of stubby lumpy braid |
While our bread was rising, we discussed some "back burner issues" - Irene said that bread machines are great for kneading dough (and I agree!), but that you have to be careful with a stand mixer. She recommended using the mixer on very low setting only to do the initial kneading, to shaggy mass stage, and then turning it out and finishing the kneading by hand. This is because it is very easy to over-knead using the stand mixer.
Our breads rose for about an hour and then were baked. I'm not sure how long or what temperature because they used a giant industrial oven, and we had gone to the next class before we were done. But they turned out beautifully!
***
On to scones!
 |
| Left to right: Whole wheat flour, white wheat flour (up in the corner), all purpose flour |
The
scones we made were made with whole wheat flour. We used white whole wheat, which is not a bleached regular whole wheat, but is instead made from white wheat berries. We learned much more about flour in the next class. Irene said that it is tricky replacing all purpose flour with whole wheat flour in recipes - she suggested starting with no more than 25%, and working up to maybe 50%, if a recipe calls for all-purpose. Or, check out
King Arthur Flour's Whole Grain Baking Book, because it's seriously amazing.
Unlike yeast dough, which loves to be touched and kneaded, it's important not to overdo it with chemically leavened bread. If you want cakey scones, you want to cut the butter into the dry ingredients so that it resembles corn meal. If you are like me, and you prefer a more tender and flakey scone, make the butter pieces a bit bigger. Irene encouraged us to get right into it with our hands.
Another great tip that she gave us was the fact that you can freeze
buttermilk. Who knew? She says that she sometimes freezes it right in
the carton, but I like the idea of freezing it in one cup portions,
pulling out as needed.
The dried fruit or other add-ins were gently incorporated at the end. A great way to do that is to turn out your dough onto a piece of plastic wrap, and then just fold the dough back and forth with the add-ins, until evenly distributed.
When it came time to pick our own add-ins.... we had a cornucopia to choose from. I decided on using chocolate chips and
mini diced ginger.
 |
| Irene's finished scones |
 |
| Perfection |
Stay tuned for even more! Our next class was on the differences between flours, and how to choose the right one.... I originally thought that I would be doing just three blog posts on this fantastic Blog & Bake, but it is going to be more... I just have so much to share with you!


oh you are seriously in heaven---what a joy this is ...hey get someone to take your photo too!! smooches
ReplyDeleteHi,
ReplyDeleteI have a quick question about your blog, do you think you could email me?
David
I'm loving these posts.
ReplyDeleteYou sound like you are having a blast and it looks like so much fun.
Warm Greetings!
ReplyDeleteToday, I visit your website and after reading your blog i realize that it is very informative. I'm highly impressed to see the comprehensive resources being offered by your site.
Thanks and Regards
Braiding Machine